Tuesday, October 28, 2008

Two Cheese Penne with Crushed Aleppo Pepper

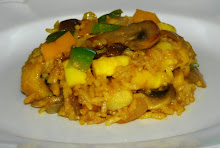
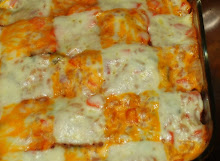
When I've had a busy day, I make one of my quick and easy recipes. This pasta recipe is one of my grown up versions of mac and cheese. I use cheeses that melt well like Colby Jack, Gruyere, or sharp cheddar. I even made this with goat cheese once. This recipe has crushed Aleppo pepper, a complex, moderately hot crimson red pepper from Syriah. Aleppo is available at Christina's Spice & Specialty Foods in Cambridge. Aleppo is one of my favorite peppers and gives any dish a little added "zip." Use your favorite type of pasta. I use Penne for this recipe because it is one of my husband's favorite type of Italian pasta.


crushed aleppo pepper

1 pound penne(or your favorite pasta)
2 tablespoons of extra virgin olive oil
3 cloves of finely chopped garlic
1/2 cup of finely minced shallots
Freshly cracked black pepper (I like crushed Tellicherry peppercorns)
1/4 lb of Colby jack cheese
1/4 lb of Monterrey cheese
2/3 cup of sour cream (I never said this was going to be a low cal meal!)
1/2 teaspoon of crushed allepo pepper. You can substitute a couple of generous pinches of crushed red pepper. You can add more if you like it hot.
Kosher or sea salt to taste

Cook your penne according to package directions. While the pasta is cooking, prepare your sauce: Using medium heat, saute your garlic for 2 minutes in a large fry pan. Add the shallots and Aleppo peppers and "sweat" onions and garlic for an additional 3 minutes. Keep a close eye on your garlic and shallots because you don't want them to burn. You want your shallots translucent and garlic slightly caramelized. Garlic and shallots sauteing in oil is one of the best aromas in the world! Add sour cream and stir for one minute. Add your Monterrey and Colby Jack cheese right in the pan. Allow cheese to melt into the sour cream. Stir occasionally. Using a bamboo skimmer/spider or a similar contraption, take out pasta 2 minutes before it reaches its aldente state and then add your pasta directly to the sauce. The pasta will finish cooking in the sauce while absorbing its flavor. Fold the pasta into the cheese sauce. Add a little pasta water to the pan and cook for a few more minutes until it penne is aldente. Add salt and pepper to taste. Transfer to serving dish and serve with your favorite side salad.

Sunday, October 26, 2008

Some of my adventures with chocolate

Fine chocolate is one of the great eating experiences in the world. Many of us are passionate about this decadent and luscious treat. I love its complexity, richness and versatility. I love beautifully crafted pastries and desserts, whether they are created by a home cook or an experienced pastry chef. Chocolate desserts are the perfect ending(or sometimes beginning) to a meal. What’s better than eating a gourmet chocolate dessert? How about going to a gourmet chocolate buffet? Here are some of some highlights from my tasting adventures with chocolate.

The Langham Hotel's Chocolate bar in Boston is the mother of all gourmet chocolate buffets. It's a chocoholic's dream come true. The 125 gourmet desserts, mousses, cookies, crepes, and panna cottas will please even the finest chocolate connoisseur. I have been to Cafe Fleuri's Chocolate Bar a few times and it's overwhelming every single time. I never know where to start. Even if you eat three or four plates of assorted desserts, you won't make a dent in their section. They are constantly restocking the supply. They use the very best chocolates in all their desserts. This is a great "special occasion place" here in Boston. My favorite foodie memory there: the chocolate bread pudding and the roasted pear and white chocolate mousse cake.

Cruise ships are known for their extravagant midnight buffets. The Celebrity Millennium cruise ship is no exception. During our February 2005 trip, we enjoyed their delicious European inspired food. At the extravagant midnight buffet, they lavished us with beef wellington and caviar ( the non beluga kind) and lots of chocolate! We sampled Italian, French, German and of course Viennese pastries and cakes. This picture was taken 10 minutes before guests raided the chocolate and dessert bar. I almost got trampled when they opened the buffet to the public but I managed to get one shot. Most memorable dessert: a chocolate praline ganache layered cake.


Norwegian Majesty Cruise, May 2006. This was wonderful Boston to Bermuda cruise. Norwegian Cruise Line is known for their midnight Chocoholic Buffet. We met a lot of friendly and hard working Filipinos working on board(about 60-70% were Filipino) and I felt right at home. A battalion of mostly Filipino pastry chefs made the most amazing chocolate sculptures and desserts. My husband and I noticed the iconic Philippine Jeepney, a very popular mode of transportation in the Philippines. The jeepney was completely made of white, dark and milk chocolate. I felt happy and nostalgic when I saw something that reminded me of my home country.


My adventures with chocolate brings us back to Boston. All these chocolate buffets inspired me to host an event called "For the Love of Chocolate" for my mom's group on November 2007. We had our own CHOCOLATE POTLUCK! We took a break from taking care of our little ones and indulged in everything chocolate! This event was pretty casual. We used paper plates and folding tables and had a great time! The participants of this event brought decadent chocolate fondue, cookies and cakes. I baked a chocolate croissant bread pudding and made a white chocolate and passion fruit mousse nestled in fillo cups(seen here). This was fun event and will gladly do this again with friends.

Thursday, October 23, 2008

Tonight's Dinner: Pata Tim or Slowly Braised Pork Shoulder in Soy, Sherry and Sesame Oil.


My mom is a fantastic Filipino cook. She makes a delicious Chicken relleno, an impressive deboned whole chicken stuffed with seasoned boneless shredded chicken meat, pork, whole eggs and spices. It’s similar to a Cajun turducken minus the turkey and the duck. Several years ago, my mom started teaching me her authentic Filipino recipes and trade secrets. I'm still learning how to cook Filipino food like her but there are several Filipino entrees, soups and desserts I can make consistently each time. I was thrilled when she taught me how to make Pata Tim, one of my favorite Filipino foods growing up. For me, Pata Tim is Filipino soul food and one of those things that remind of me of my childhood in the Philippines and my mom's home cooking.

Filipino Food has been influenced by many different types of cuisines: Spanish, Indo-Malaysian, American, Chinese and so on. Pata tim is a Filipino dish with a strong Cantonese influence. It's similar to a steamed pork shoulder I've had at authentic Chinese restaurants. What is Pata Tim? It's a slowly braised pork leg (pata = pork keg) in a flavorful braising liquid. When I make Pata Tim, I use a Boston pork butt or pork shoulder(pork rind and all) instead of pata. It's meatier than pork legs and we like meat! If you never had Filipino Pata Tim but had pied de cochon(pig trotter) from French restaurants, you will like this dish too. Eating Pata Tim is a quick trip to cholesterol city but it’s worth it as long as you don't overdo it.

This dish is not too hard to prepare. First, I seared all sides in a couple of tablespoons of oil. Then I braised the pork in water, good quality dry sherry, soy sauce, brown sugar, dried shitake mushrooms, star anise, peppercorns and a Filipino mirepoix: a combination of finely chopped onion, garlic, and grated ginger for six or seven happy hours in a crock pot. The meat falls of the bone and you end up with a delicious sweet, tender, melt in your mouth pork. I like to serve it with Jasmine rice and green peas(or salad greens) and garnish it with finely chopped green onions. Pata Tim is also great as leftovers.

Monday, October 20, 2008

A Gourmet Sundae for Foodies


A Spotlight on Aged Balsamic Vinegar: I’m a fan of this stuff. It's like the perfect little black dress. It's sexy, it stands out in a crowd and you don't use it everyday. Aged balsamic vinegar is not your average supermarket balsamic vinegar. It has a nice amount of acid and a sweet, intense and complex taste. It refines the palate in an indescribable way. This syrupy sensation is great over berries or sweet creamy food like a sweetened marscapone tarts or vanilla bean ice cream. It’s also great with salads. Here’s a quick and easy recipe using aged balsamic vinegar and ice cream. Vinegar and ice cream??? Don’t knock it till you try it. If you like a sharp contrast in flavors, you will love this dessert.
Anyone can make this in a flash. You need two ingredients and the best aged balsamic vinegar you can find. I like aged balsamic vinegar that's at least 12 years old. Yes, aged balsamic vinegar is expensive but a little goes a long long way. Where can you find great aged balsamic in Boston? The North End of course! Salumeria Italiana on 151 Richmond Street, Boston, MA 02109 is a small but fantastic authentic Italian grocer. You can also purchase it online.

Vanilla Bean Ice Cream with Raspberries and aged balsamic vinegar for two:

1/3 cup of raspberries or sliced strawberries
1 cup of super premium vanilla bean ice cream
2 tablespoons of aged balsamic vinegar (I use Fattoria Estense. Balsamic Vinegar of Modena, 12 years old).

Directions: Scoop vanilla bean ice cream into your favorite ice cream dish. Arrange raspberries or sliced strawberries on top. Drizzle aged balsamic vinegar on top. Eat. Savor. Molto Bene.

Thursday, October 16, 2008

Tonight's Dinner: Korean Fire Pork!


When I crave Korean food, I make Korean Fire Pork. I learned how to make this lovely dish from my gal pal Doohee. I love a flavor profile that's both spicy and sweet. I marinated thinly sliced pork in a wonderful Korean chili paste called kuchu jang overnight. I also added sliced onions, chopped garlic, green onions, ginger, roasted sesame oil, sugar, soy sauce, asian pear puree, and a touch of sake to the marinade. The next day, I sauteed the pork in its own juices until the meat was fully cooked. This dish is also great grilled. I served it with homemade Chinese chive kimchee, Japanese sticky rice and a side salad.

Wild Salmon, Cucumber, Avocado and Japanese Pickled Daikon Rolls!


I took a sushi class with a sushi master last spring. Ever since then, I have been making inside-out or uramaki sushi for dinner and parties. Making your own sushi is innexpensive and fun!
This recipe has “cooked” fish so even our toddler can eat it. I like to eat toro sashimi and yellow fin sushi at restaurants but I don’t like to make sushi with raw fish at home. Grade A tuna and salmon are too expensive for our weeknight dinners and our little one can’t eat it. For this recipe, you can cook the wild salmon your way – poached, lightly sautéed or even sous vide!
What you need:
5 or 6 oz piece of cooked wild salmon filet. You want to flake this salmon filet and then mix with
½ teaspoon of wasabi paste and 1 tablespoon of Japanese Mayonnaise (a lot like making tuna salad for sandwiches)
5 cups of freshly cooked seasoned sushi rice
6 small sheets of toasted nori
1 ripe avocado, cut into thin sticks
4 inch piece of cucumber cut into thin sticks
4 inch piece of Japanese pickled daikon cut into thin sticks

Now, let’s roll…
Put a sheet of nori shiny side down on a rolling mat (covered with plastic wrap for easy cleaning). Using wet hands (put a bowl of water next to you), spread about ¾ cup of rice in an even layer on the nori. Cover the entire nori with rice. Gently turn it over. You will fill the “nori” side with your other ingredients.
Spread a thin line of a tablespoon of the salmon-mayo mix on the nori (the side that's closest to you). Put a line of avocado sticks on top of the salmon and then lay a line of cucumber sticks next to the avocado. Lastly put a line of pickled daikon next to avocado. You get the picture.
Roll the sushi, starting at the end where the ingredients are, and tucking the end of the nori. Squeeze gently and keep rolling until you end up with a finished roll. Repeat the process until you run out of ingredients.
Cut it into even bite size pieces with a wet and a super sharp knife. Arrange them on a plate and serve with soy sauce and pickled ginger.
I hope you enjoyed that recipe. Honto ni arigato gozaimas (thank you very much)!

Sunday, October 12, 2008

Now this is my cup of tea...


I love making homemade ice cream with exotic flavors like saffron or thai tea. Thai tea or “cha yen” is a strong black tea flavored with one of my favorite spices, star anise. It’s great with sweetened condensed milk and if you were me, lots of cream and sugar. Why not take it a step further and make ice cream out of thai iced tea? Here is my recipe for a French custard based ice cream infused with thai tea!

2 cups whole milk
2 cups heavy cream
4 thai tea bags (fill large tea filters with 3-4 teaspoons of thai tea and tie tea filters with a tight knot).
2 large eggs
4 large egg yolks
1 and ¼ cups of sugar
¾ cup roasted cashews(optional)

Combine milk and cream in a saucier or heavy duty sauce pan. Add tea bags and allow to steep. Bring to a slow boil over medium heat, reduce the heat to low and simmer for 30 minutes, stirring occasionally. Combine eggs, egg yolks and sugar in a medium bowl. Use an automatic hand mixer to beat eggs, egg yolks and sugar for a couple of minutes. Temper the egg mixture by pouring out one cup of the hot liquid into the egg and sugar mixture. With the mixer on low speed, add the cup of hot milk and cream in a slow steady stream. When thoroughly combined, pour the egg mixture back into the saucepan and stir to combine. Cook gently and constantly for about 4 minutes. Don’t leave this unattended or you will end up with scrambled eggs in your ice cream. Transfer to a bowl and chill completely(tea bags included). Cover with plastic wrap. Making great ice cream is a two day process so allow for flavors to marry for at least 12 hours. Take tea bags out of the custard mix before making into ice cream. Add cashews or your favorite nut into the custard mix for a crunchy texture. Freeze according to the manufacturer's directions. I use a Cuisinart Automatic Ice Cream maker. It's great for making sorbets and homemade ice cream. Transfer to a covered plastic container and put in the freezer for a couple of hours before eating.